Science Experiments
Changing Colours
Jameson's Science Experiment - LINK
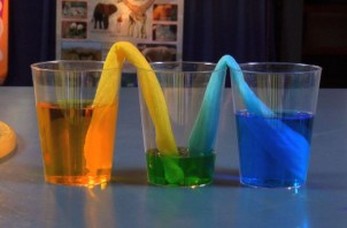
Ok let’s go wild and fill 2 cups with water, add blue dye to one cup and yellow dye to the other. Put an empty cup in between them. Roll 2 paper towels. Place the end of one towel into the blue dye and one end of the other towel in the yellow dye. Bend both the towels and put the loose ends into the empty cup and watch the magic happen. As the coloured water is absorbed in the towel it makes its way up and then into the empty cup. The blue and yellow food dyes combine making green water. How amazing is that!
Ok let’s go wild and fill 2 cups with water, add blue dye to one cup and yellow dye to the other. Put an empty cup in between them. Roll 2 paper towels. Place the end of one towel into the blue dye and one end of the other towel in the yellow dye. Bend both the towels and put the loose ends into the empty cup and watch the magic happen. As the coloured water is absorbed in the towel it makes its way up and then into the empty cup. The blue and yellow food dyes combine making green water. How amazing is that!
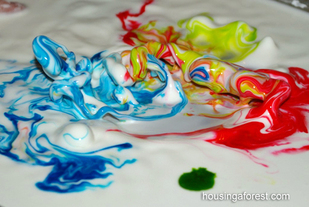
Amazing Milk
Jameson's Science Experiment - LINK
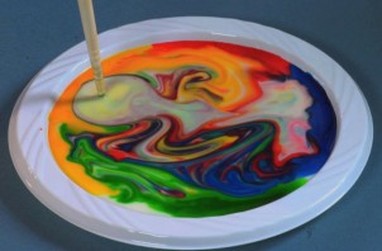
Here is what you will need for this amazing milk experiment:
Some full cream milk, a chopstick, some food dye, a liquid dish washing detergent and a plastic plate. Check out the website for the instructions!
Here is what you will need for this amazing milk experiment:
Some full cream milk, a chopstick, some food dye, a liquid dish washing detergent and a plastic plate. Check out the website for the instructions!
Fossils
Jameson's Science Lab - LINK
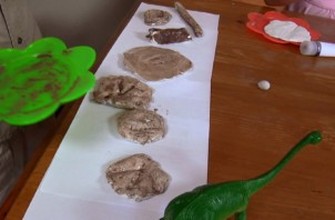
Here’s what you will need to make your own fossils:
White modelling clay, some shells with patterns on them, some leaves, some paints and brushes, a plastic cup, a mixing stick and a spade to hide the fossils afterwards. Check out the link for the instructions!
Here’s what you will need to make your own fossils:
White modelling clay, some shells with patterns on them, some leaves, some paints and brushes, a plastic cup, a mixing stick and a spade to hide the fossils afterwards. Check out the link for the instructions!
Magic Can
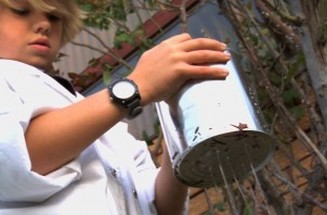
Jameson's Science Lab - LINK
Jameson uses some science and air pressure to show how you can put holes in the bottom of a can, fill it with water and then stop the water draining out by putting another hole in the top of the can.
This is what you’re going to need for this experiment:
A large can with a lid, a hammer, a nail, a clear cup, a straw, food dye plus a grown up.
First get a grown up to put 5 holes in the bottom of the can using a hammer and nail. Hold the can over a sink and pour water into it and look what happens, the water comes out of the holes. Let’s see if we can stop the water coming out by using air pressure. Look at the website for the instructions!
Colourful Carnations
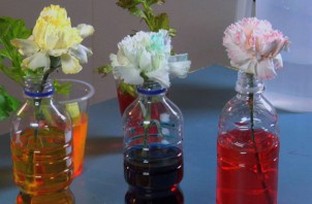
Jameson's Science Lab - LINK
Here is what you will need for my Colorful Carnation experiment:
White carnations, water, 3 clear plastic bottles, food dye, celery, a funnel, plastic knives and 3 plastic cups.
Use a funnel to fill 3 bottles about 2/3rds full of water. Add a different coloured food dye in each of the bottles. Look at the link for further instructions.
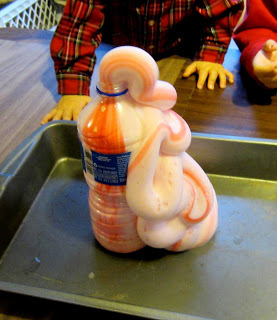
Elephant Toothpaste
Preschool Packets LINK
1. Set a soda pop bottle in the middle of a pan to catch the toothpaste.
2. Mix these in a separate container and swirl together for a minute. The yeast will catalyze (or speed up) the reaction. Woo hoo!
** 2 Tablespoons warm water
** 1 teaspoon yeast
3. Mix these in your soda pop bottle:
** 1/2 cup 6% hydrogen peroxide. It is important to use at least 6%. You can use 8% or more (available on Amazon), or you can Salon Care Professional Stabilized Formula. 20 Volume Clear Developer from Sally Beauty Supply works fine too. 3% from the grocery store will NOT work as well. :)
** 4-5 drops food coloring
** squirt of dish soap
4. Pour the yeast mixture into the soda pop bottle...and be amazed!
Apples and Handwashing
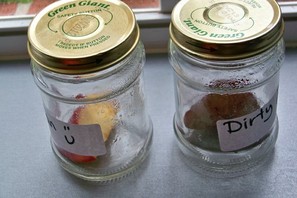
From a Classroom Teacher: "We put a clean apple slice in one jar. We passed another apple slice around the class as we came in from recess with dirty hands. We have been observing the two jars in the science center. This is the difference after 8 days - gross! (This picture doesn't really show the mold.)" - A great way to teach about germs.
Cloud Jars
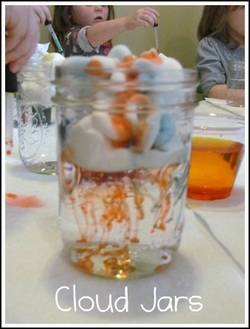
Teach Preschool LINK
The process
We started by covering the entire table with two layers of good quality paper towels. Then each child (threes through – Prek) was given their own mason jar filled 2/3′s with water. In addition, each child shared four cups of colored water (we added food color) with a partner. Every child was also given a dropper to work with… Once we had all the water and colored water in place, Mrs. Stewart added a “cumulus cloud” (shave cream) on top of the water in each child’s jar…And then Mrs. Stewart demonstrated how to add drops of color on top of the shave cream then to watch carefully as the color made its way through the “cloud” and then dropped into our clear water down below.
Dancing Oobleck
Watch this video to see how it works!
http://www.youtube.com/watch?feature=player_embedded&v=weSTbkh_VJM
We used about 2 cups of corn starch and 1 cup of water.You will need a subwoofer, a thin metal cookie sheet, a MP3 of an audio test tone and food coloring. Place the cookie sheet onto the speaker of the sub, and pour in the Oobleck. You can download different test tones and play to see what works best for you. We used 40 Hz, 50 Hz, and 63 Hz, and found that we needed to turn the volume way up. We tried a number of different frequencies but these three seemed to work the best. We did a search for subwoofer test MP3. There are a number of different sites that you can use. Before you play the MP3 you will need to place your fingers on the edge of the cookie sheet with gentle pressure. It took a bit of playing to see what worked the best, but the results were amazing. CLICK HERE FOR MORE DETAILS
Lava Lamp
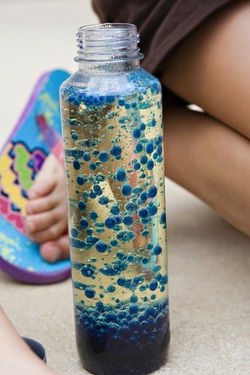
S.L.Smith LINK
You will need 3 empty water bottles ( I don't normally buy this kind of water, but they make pretty lava lamps with the lids on), food coloring, vegetable oil, and alka seltzer. Fill each bottle a little more than half with oil:
Then fill the rest of the way with water. Leave about an inch at the top:
Now add 10 drops of food coloring:
Break your Alka Seltzer into 4 pieces and drop them in one piece at a time. Wait until the first piece stops bubbling before you drop in the next. If too many go in, you solution gets all cloudy.
Wizards Brew
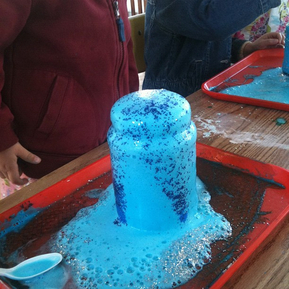
You will need:
- Baking Soda
- Glitter
- Dishsoap
- Vinegar
- Glass jar
- Food coloring
DIY Chia Pet
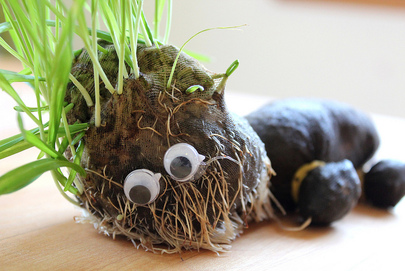
DIY Chia Pet Materials:
Instructions:
- Knee high stockings
- Potting soil
- Wheat grass seeds
- Googly eyes
- Hot glue gun
- Rubber bands
- Paper cup with bottom cut out
- Water
Instructions:
- Dip a stocking in water to moisten it, wring it out.
- Place the cup inside the top of the stocking to create a make shift funnel. This will help you easily get the soil into the wet stocking.
- Drop in a teaspoon or so of wheat grass seeds, make sure they are at the bottom of the stocking.
- Fill the stocking with enough potting soil to make the body and head of your “creature”Tie a knot in the end of the stocking to prevent the soil from coming out. Cut the end of any remaining stocking off
- Use rubber bands to make a head and legs for the creature. Legs really help this from looking like a something you fished out of you know where!
Dinosaur Eggs
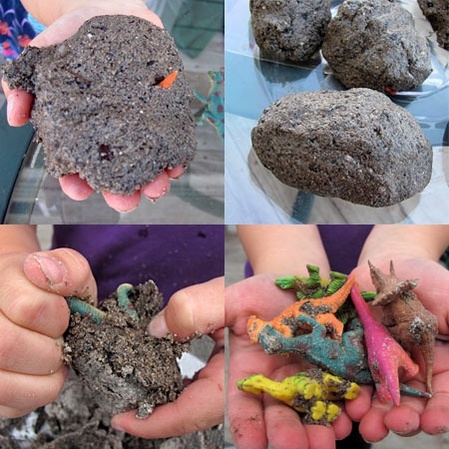
Projects for Preschoolers LINK
Make your own dinosaur eggs, fun preschool craft - 1 1/4 cups dirt, 1 1/4 cups flour, 3/4 cups of salt, 1/2 cup of sand - mix dry ingredients then add water to create a dough, clay-like texture, mold around plastic critters and let dry in the sun. Then let the kiddos break open to discover what's inside.
